

DIY Emerald Gem Mirror
I’m super excited to share this DIY mirror tutorial with you today because a) it’s my first post of 2016 and b) I’ve never been so thrilled about a blog post before, and I hope you feel the same!
If you’re like me, and you read A Beautiful Mess religiously, then I’m sure you’ll be familiar with the Gem mirror tutorial that Laura posted in early 2015.
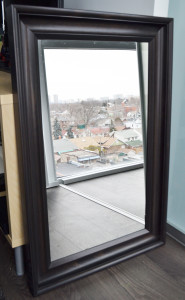
I lusted over this mirror for ages, wanting to recreate one of my own, but never had the time or the supplies to do it. However, after we moved, I realized that I did at least have the mirror! We had been using this mirror for my vanity because my usual vanity mirror had to replace the hideous mirror that was in our old bathroom. But, since my vanity mirror is back in it’s rightful place, I now have a mirror to work with! I also was able to ask for the rest of the supplies for Christmas, so all this project costed me was my time!
While I was inspired by the octagonal gem shape, I wanted to use my rectangular mirror to create an original design in an emerald shape. I also chose an emerald because the mirror will be resting on the top of our dresser, so I still want to be able to see my face in it - and an octagonal one would have been too short.
The only problem with my mirror was that it was in a large wood frame, so I had to get it out of there first. Lucky for me, the mirror was just glued into the back of the frame, so I just had to remove the glue and some pins and I had a mirror ready to be cut!
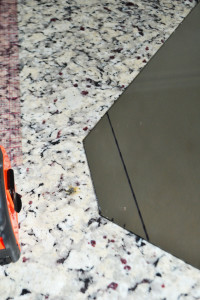
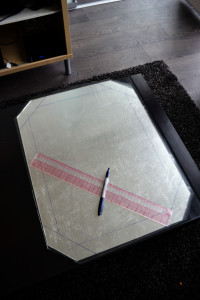
After partially reading the tutorial on ABM, I sat down to cut my glass. In order to create an Emerald shape, you want to start with a rectangular mirror. Mine measured 17 1/2″ x 30″ originally. All of the emeralds that I looked up were just a bit longer than they were wide, so I cut my glass down to 17 1/2″ x 23 1/2″ in order to get a better shape. Then it was time to take off the corners to make it look like a real emerald. I measured 2.5″ from the corner along each side, and then drew a diagonal line attaching them. I then scored and broke off each of the 4 corners. One of them didn’t come out quite as clean as I would have liked, but it’s still got a good shape.
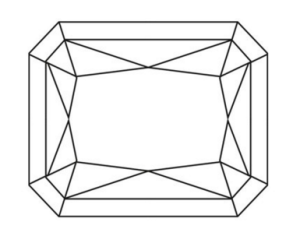
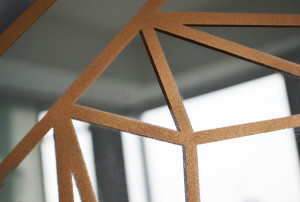
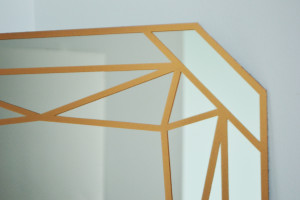
For the rest of the process, I followed the tutorial on ABM, just modifying it for my emerald shape. Originally, I had thought that an Emerald was just cut in straight lines, so I was going to do that, but then I found this image on google that had many more facets and I was in love! At that point, my excitement for the project increased exponentially and I was SO much more eager to see the end result.
I used this image here to create my facets:
To make the gem lines follow these steps:
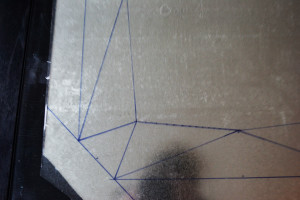
- Make a 1/4″ border around the outside of your mirror (This will end up being gold)**
- Draw a 1 1/2″ border around your entire mirror starting from the edge of the mirror.
- On each of the corners, find the middle and make a dot 2″ away from the border line.
- Connect the dot to each of the corners of the border to make your triangle.
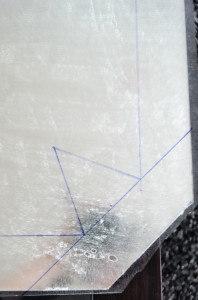
4. Next, it’s time to make the gem lines on the sides.
5. Pick a side and measure it to find the middle.
6. Once you have found the middle, measure 1 7/8″ out from the border and make a dot
7. Starting from the dot make two lines. Connect one to the top of the triangle and another to the bottom
8. Repeat on all sides.
** You can’t see the 1/4″ border that I drew because I actually had to do the mirror twice, I made a mistake the first time and forgot the small border so I had to scrape off all the paint and redo it.
Once the gem lines were drawn on, I measured an 1/8″ on either side of each line and scored it with my exacto knife. I use a clear C-Thru ruler that I got while at school at Ryerson, and it’s quite possible one of the best rulers imaginable. I highly recommend using one for this project!
After everything was cut, I started to peel the contact paper away from the lines and reveal the glass underneath. At this point, I was already so giddy about how good the mirror was looking that I did a little dance. Completely acceptable.
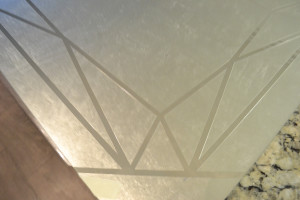

After I got over my excitement, I spray painted the mirror with two coats of gold spray paint and a coat of clear spray paint. After the paint was dry, it was time to reveal the delicate gold lines! I was super excited about this part, but also really scared because I wanted to make sure that the lines came out super crisp. In order to ensure that, I took my exacto knife and lightly scored around the edges of my contact paper. I then began to very cautiously peel my contact paper away to reveal the mirror underneath.
If peeling off the cutting lines was exciting, then this was just astronomically exciting. Every time I took a piece off perfectly, I got happier, and happier that I had finally done this project, and that it had come out so well. Once all the contact paper was off, I just stood back and admired my hard work with the biggest smile on my face.
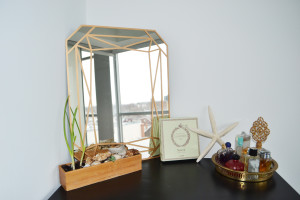
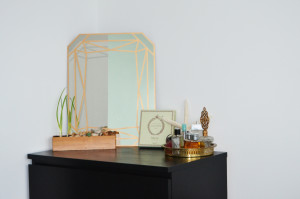
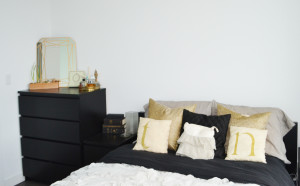
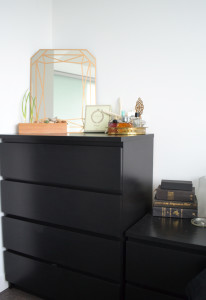
My gorgeous mirror was now done and ready to display in our bedroom!
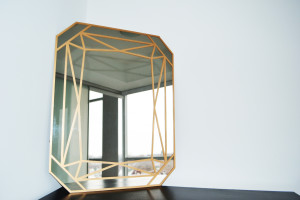
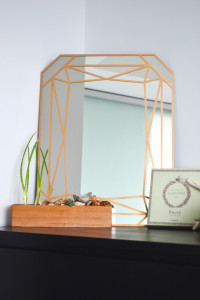
It took me almost a full days work to complete, but I think the result was worth it! Let me know what you think and if you would try this emerald gem mirror!
xo, tess.

25 responses to “DIY Emerald Gem Mirror”
About Angean

Shop Angean on Etsy!
Archives
- January 2018
- October 2017
- September 2017
- August 2017
- April 2017
- February 2017
- January 2017
- December 2016
- November 2016
- September 2016
- August 2016
- July 2016
- June 2016
- May 2016
- April 2016
- March 2016
- February 2016
- January 2016
- December 2015
- November 2015
- October 2015
- September 2015
- August 2015
- July 2015
- June 2015
Bloglovin’
Follow


Looks amazing Tess! I love it!
Thanks Kara 🙂
Gorgeous!! I love A Beautiful Mess! You did an amazing job!
http://mommygonetropical.com
Thank you Elizabeth!! 🙂
I love this so much! It’s beautiful!
Thank you so much Jen 🙂
Wow this is beautiful! I’m not sure I have the patience to get creating myself but I can certainly appreciate and admire the beauty in your mirror.
Thank you so much Bree! It definitely did take a great deal of patience, especially since I had to do it twice because I messed it up the first time 😛
Okay, that mirror is BA! Nice share 🙂
Thank you so much Warren 🙂
I love this idea! It came out really well and looks amazing in the room. Thank you for sharing your creativity.
Thank you so much Ashley! Glad you liked it 🙂
This is beautiful! I haven’t gotten up the nerve yet to try and cut or modify glass, but I have a few tall mirrors which could easily be modified for this tutorial. I’m definitely pinning this for later!!
Thank you so much 🙂 That’s amazing! I love when I can DIY things that I already have!
Love it!! 🙂 Its so pretty!
Thank you so much Ashima! 🙂
Beautiful ! Looking for a déco’s DIY so thank !
Thank you so much!
That looks great! I don’t think I’d be able to do it!
Thank you Milena! You never know until you try 🙂
This looks amazing. I plan to do a lot of DIY projects when I move again.
Thank you Shantel! That’s one of the best parts of moving to a new place 🙂
So very pretty, I am not going to lie I would be scared to do this DIY job.
Thank you Iman! I was definitely a little scared doing it myself 😛
[…] up on the apartment tour, we have the Emerald Gem Mirror. This was inspired by A Beautiful Mess and came out 1000x better than I ever could have imagined. […]